I had seen a mortar board (graduation cap) made out of a dollar bill on the internet. I even went as far as finding the creator and emailed them. I was directed to OrigamiUSA Source to buy the book that the directions were published in. (Did you know that they have origami conventions and books FULL of instructions written by these master folders!?) Anyway, I happily paid the money for 2003 Origami Collection and waited. I was so excited to get it because I had planned to give little dollar bill mortarboards to our Class of 2008 friends. I mean really...how cool would that be?!?! to give a bill folded in the shape of a graduation cap!!!! I was greatly disappointed when I couldn't figure out the directions in the book. I do not think it was because they were poorly written. On the contrary, they were very well written - but for someone with experience in paper folding...which I do not have! After many tries, folds and manipulations of the bill, somehow (through a small miracle, actually!) in the end, it turned out to look like what I had initially seen, although not the way in the book.
After researching origami a bit, I think I could become quite addicted to it. It is wild what they can make out of a dollar bill or a piece of paper!! Now that I have the book, I hope to learn how to make some other stuff. It has instructions to over 100 designs made by the best folders in the world. I only ended up giving one graduation cap but he LOVED it!- (by the time I figured out a way to make it work, everyone was graduated! ha ha)Now to figure out how to make the camera! I already know exactly who I am giving it to!

So much to learn, so little time
Tuesday, June 10, 2008
Fun Colored Pencil Technique
I wanted to send a thank-you to some special friends for a great time we spent together at the beach. We just came home yesterday though and I hadn't gotten any pics developed yet so I did the next best thing. I had been wanting to do something with this technique for a while and it was the perfect opportunity. I printed one of the photos onto regular copy paper and then colored some of the picture, mounted it and in about 10 minutes got a pretty happenin' card. Kal Barteski taught this technique - she is an AMAZING artist!
It is not hard at all and I do agree that Prismacolor pencils are the absolute best! The color is creamy and smooth. (sounds like ice cream!) But it really is. Try some of her techniques - anyone can do it and the end result is way cool!
It is not hard at all and I do agree that Prismacolor pencils are the absolute best! The color is creamy and smooth. (sounds like ice cream!) But it really is. Try some of her techniques - anyone can do it and the end result is way cool!
Wednesday, June 4, 2008
Graduation Party
 I carried over the theme of the graduation symbol for the party. I used it as hanging decor with large 12 inch circles, used some left over invite circles to write what each food item was, 1 inch symbols on tags for the party favors, and also made him some thank you notes with it too. (I'll post those later)
 (some of Nelson's friends in the basement)
We made these fabulous little cupcake pops for the party favors. (I forgot to take a picture when we had them piled up on a tiered stand so I gathered the leftovers for this pic. )I came across her blog a few months ago and LOVED them. I was just waiting for an opportunity to make them. They were a bit time consuming but so worth it! I got SO many compliments on them and people said they were the best thing they ever put in their mouth! I must admit, they were quite tasty. ;)
 Special thanks to my SIL, Mandi, who helped tons with food preparation, my bro, J, who helped me get our exterior ready and my sweet mom and dad who helped with a whole bunch of other stuff! I couldn't have done it without them!
Nelson had a great party and now we're on to the next stage in his life (deep breath....) College.
Graduation Invitations
As I told you, in the previous post, our kids went to Beach Camp. So I am taking a couple of minutes to post some new stuff.
Our son is now a high school graduate and I wanted to share how his party invitations came about.
First, I found this AWESOME graduation symbol at http://www.shutterstock.com/. I knew I wanted the invitation round, but was thinking about doing it larger and packaging it in a CD envelope. Before I got around to making it the size of a CD envelope, I found some chipboard coasters at Michael's on clearance. Gotta love that! From the looks of them, you can tell why they were on clearance! They have fruit all over them and are not the prettiest.

 So I adjusted the file to the diameter of the coaster and printed 4 to a page. I cut them out with a circle cutter and mod podged them to one side of the coaster. I copied the file and removed the symbol and replaced it with text for the party invite. I cut those out and mod podged them to the other side of the coaster. I sanded the edges to distress them a bit and to smooth down the edges.
Our son is now a high school graduate and I wanted to share how his party invitations came about.
First, I found this AWESOME graduation symbol at http://www.shutterstock.com/. I knew I wanted the invitation round, but was thinking about doing it larger and packaging it in a CD envelope. Before I got around to making it the size of a CD envelope, I found some chipboard coasters at Michael's on clearance. Gotta love that! From the looks of them, you can tell why they were on clearance! They have fruit all over them and are not the prettiest.
So I adjusted the file to the diameter of the coaster and printed 4 to a page. I cut them out with a circle cutter and mod podged them to one side of the coaster. I copied the file and removed the symbol and replaced it with text for the party invite. I cut those out and mod podged them to the other side of the coaster. I sanded the edges to distress them a bit and to smooth down the edges. 
They ended up round just like I wanted and how cool to have a "token" type invite! Another benefit of having the smaller-than-a-CD size was that I just put them in with the announcement and mailed them together instead of the square envelope that would have cost us extra postage!
Swimsuit Dilemma
Ok, so we have 2 teenage daughters - both of which are wonderful! (most days! :) and in getting them ready to go to Beach Camp, with the student ministry at church, we have been on the search for the perfect one-piece swimsuit... hence, the title "Swimsuit Dilemma". We found many but most either didn't fit properly or were too revealing. Usually finding that because they were too revealing was causing "the not fitting properly"! We finally found one that was almost acceptable. In seeing it on my youngest, I thought we could make it work with a little adjustment.
We went straight to Hobby Lobby and I bought some ribbon that I thought would work. It wasn't wide enough so I sewed three strips together to make the inset. ***Tip: I put Fray-Check on the cut ends before sewing them. That stuff is fabulous! 

I pinned the inset that I had made from the ribbon to the correct position and handstitched it in. (Clarification: Actually, my mom dropped by about that time and she handstitched it in!)  It didn't take long at all to make a revealing swimsuit turn into a modest swimsuit.
 On another note, my other daughter also had an issue with the swimsuit that she was taking. It, too, was too low cut. I tried the ribbon thing for her too (different ribbon of course!) but it didn't look right. We ended up stitching up the opening about 2 1/2 inches. It solved the problem.
It didn't take long at all to make a revealing swimsuit turn into a modest swimsuit.On another note, my other daughter also had an issue with the swimsuit that she was taking. It, too, was too low cut. I tried the ribbon thing for her too (different ribbon of course!) but it didn't look right. We ended up stitching up the opening about 2 1/2 inches. It solved the problem. Remember when looking for clothes, household decor or whatever else you might be on the prowl for that you can change it. You don't have to wear it as you bought it or display it as the store had it!
Friday, May 9, 2008
Extra Special Thank You
We recently received a very special invitation in which case I felt it called for an extra special thank you! Something a little more memorable than a regular thank you card. So, I got on the internet and found the towel animal directions here. Made the card super quick by sewing a pocket and making a card that pulls out. It truly took me longer to try to navigate through my work room than it did to put this together - it's quite the mess right now !! About 15 minutes from start to finish for a pretty cute thank you if I say so myself. :)

Monday, May 5, 2008
Creative Gift Packaging
Today's segment on Every Day with Marcus & Lisa was on creative gift packaging. Let me just say that our time (12 minutes) evaporated! Before I knew it, it was time to wrap it up (no pun intended!! haha) and we were done. I didn't get to everything, which is fine because it leaves something to show the audience another time. : ) We had a great time and Lisa highlighted some fabulous jewelry too. Make sure to check it out.
 I added the 2nd piece of paper that covered remaining surface of the can, adhering it with sticky tape as you did in the earlier step - this piece will measure 12 inches long, which is the full width of a piece of a 12 x 12 inch scrapbook paper.
 Then I embellished it with a chipboard star, the letter "P" and some twine and in went a bundle of hand-stamped onesies for a sweet little friend. I hammered it shut and gave a paint can opener along with it.
 Another version of the quart sized can - I used the sewing machine on this one though. I made a "Koozie" of sorts and the covering literally slipped on and then the heart on top was sewn and stuffed so that it is raised.
 The gallon paint cans are done the same way. Measuring, cutting, taping and placing paper on can. Below are some that were on the show today.


 If you have any questions, just send them my way. I hope you'll try to make one of these....it's a great way to package a gift!
Like I told ya'll, the purpose of the whole segment today was to show some creative ways to package gifts. I featured paint cans and some small felt purses that I had designed.
Instructions for Decorated Paint Cans:
Start with an empty paint can. These are new cans which can be purchased at your local hardware stores. (I am into recycling, but there is something about trying to clean out a paint can that isn't very appealing!)
You will also need some double sticky tape. I used Stampin Up! sticky strip tape, but have also used Terrifically Tacky tape too. Both work well.
You will need to measure from right under top rim to right above the bottom rim. The measurement from rim to rim for the cans I bought are as follows: gallon, 7 7/16 inches and quart, 4 5/8 inches.
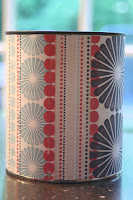
This is a quart sized can. I put a 2.5 inch wide piece where the seam is. ***tip: I used a paper with a stripe in it so that the piecing wouldn't be as obvious.***
Cut your paper and along all 4 sides, run the sticky tape. Peel off backing and stick to can. Work carefully as it is VERY tacky and sticks easily. Gently place the paper on so in case you have to attempt to take it back off you will have a better chance.
I added the 2nd piece of paper that covered remaining surface of the can, adhering it with sticky tape as you did in the earlier step - this piece will measure 12 inches long, which is the full width of a piece of a 12 x 12 inch scrapbook paper.Then I embellished it with a chipboard star, the letter "P" and some twine and in went a bundle of hand-stamped onesies for a sweet little friend. I hammered it shut and gave a paint can opener along with it.Another version of the quart sized can - I used the sewing machine on this one though. I made a "Koozie" of sorts and the covering literally slipped on and then the heart on top was sewn and stuffed so that it is raised.The gallon paint cans are done the same way. Measuring, cutting, taping and placing paper on can. Below are some that were on the show today. If you have any questions, just send them my way. I hope you'll try to make one of these....it's a great way to package a gift!
Subscribe to:
Posts (Atom)