


So much to learn, so little time
 I added the 2nd piece of paper that covered remaining surface of the can, adhering it with sticky tape as you did in the earlier step - this piece will measure 12 inches long, which is the full width of a piece of a 12 x 12 inch scrapbook paper.
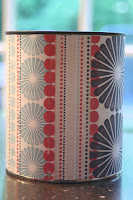 Then I embellished it with a chipboard star, the letter "P" and some twine and in went a bundle of hand-stamped onesies for a sweet little friend. I hammered it shut and gave a paint can opener along with it.
 Another version of the quart sized can - I used the sewing machine on this one though. I made a "Koozie" of sorts and the covering literally slipped on and then the heart on top was sewn and stuffed so that it is raised.
 The gallon paint cans are done the same way. Measuring, cutting, taping and placing paper on can. Below are some that were on the show today.


 If you have any questions, just send them my way. I hope you'll try to make one of these....it's a great way to package a gift!