Pages

Monday, December 29, 2008

Kim Wheeler - Painter Extraordinaire!

Ok, I have to tell all of you about this amazing artist I have been following for quite some time.  I came across Kim Wheeler's blog  and loved it from the first time I saw her work.  This Christmas she came up with the cutest idea to make some decorative canvases.  She was SO overwhelmed with orders that she had to tell people she couldn't take any more. BTW, she has 4 little kids too! Anyway, I attempted to make some canvases like hers (since her orders were closed) for my house.  They lack her special touches - she adds shimmer and some bling to her canvases -  but they will have to do until I can get an original Kim Wheeler work of art one day!

She can do anything it seems!  You will see that quickly by viewing her gallery and the various patterns she creates for different orders.

I even emailed her to tell her how much I admire her work and she might be coming to Atlanta soon and we might get together!! I'm so excited!  I will keep you updated! :)


Tuesday, December 23, 2008

A quick card holder


Yes, I realize it has been a LONG time since I last posted.  I have the great privilege of decorating our church and since Thanksgiving that is what I have been doing....along with planning many events! I didn't even get my own tree and decorations up until the 18th at 2am!!
While tidy-ing up on Saturday morning, I found myself with a stack of Christmas cards needing a home.  I, of course, wanted to display them but no where seemed suitable then I remembered I had an empty frame and some chicken wire (don't ask me how I had chicken wire!!)! So I took the frame out to the garage and started stapling chicken wire to the back of it.  It took about 10 minutes from start to finish! I brought it back in and propped it on our little buffet in the dining room.  I took some small clothespins I had and pinned the cards and pictures to the wire and had a great display!


BEFORE

STAPLE WIRE TO FRAME


TRIM END


READY FOR DISPLAY!


Tuesday, November 11, 2008

You mean I missed Halloween!?!?!?

Just kidding!  But it DID fly by! Somehow it got lost with everything else I had going on.  I used to make awesome costumes for my kids but now they just pulled something together on their own. (granted, they are 13 & 16 and one is a college freshman!!) But for some reason my girls wanted to Trick-or-Treat this year.   It's the latest craze amongst teens - pretend for one night that you're still little!! I actually like that they want to stay young for a bit!

Our son did come home for the weekend and I did help him with his makeup - he was the Joker from The Dark Knight.  He came home because we had tickets to see Wicked! If ever you have a chance to go see it...GO! It is SO worth every penny! The minute it was over, I wanted to see it again!

Anyway, I didn't get a chance to post some altered letters I did and I will give you a peek at my mantle - or should I say my dusty mantle but hey! who wants to dust when there is paper to play with?!?! I love mantles!! The jack-o-lanterns have been taken down and put away for another year but it is still ready for Thanksgiving. :)


Saturday, November 8, 2008

If you were wondering....here's a peek at what I've been up to lately!

I was working on an event for our annual Mission's Conference where I work (First Baptist Church of Atlanta).  My sweet friend Tracey, our assistant pastor's wife, was put over the annual Shower of Love - an event for the women missionaries and I got to plan the event with her.  That's my job at FBA. Isn't that the best job ever!?!? I plan events/parties and get paid for it!!!

White paper lanterns were hung to bring the ceiling line down, table linens were floor length (LOVE that!), individual bottles of sparkling lemonade and REAL dishes were at each place setting.  It was an banquet type event for our missionary women, who were visiting for the conference, and the women of our church bought tickets to come.  The whole event is to get the know the missionaries on a more personal level and to "shower them with love".  We made prayer books with the awesome Bind-It-All for each person!  Yes, all 210 people in attendance had a prayer book at their place setting!! The chipboard cover and the 80 or so pages of each book all punched by hand!! So if you were wondering if that little manual machine was durable, the answer is YES! And if you were wondering if our hands were sore, that answer is also YES!! 

At the end of the event we gave each missionary a monetary gift but we wanted to give it in a unique way so we came up with the idea of a origami type money flower.  I was thinking more along the lines of a bouquet of money roses, but Tracey found a pattern that was an even better idea.  She made each of the 33 missionaries a corsage out of crisp bills and then put them in corsage containers. They were SO adorable! 

So now on to Christmas for me but keep checking back because I have some fun stuff coming up for EveryDay with Marcus and Lisa!!


Monday, October 6, 2008

Etched Glass


So, today's segment on Everyday with Marcus & Lisa was on etching glass.  I'm telling you it is SO not hard! and looks fabulous!! Definitely something you could do for yourself, your friends, as a hostess gift, teacher gift or even a gift for that hard-to-buy-for executive in your life (i.e. BOSS!)

Supplies needed: Armour Etch (available at Michael's, Hobby Lobby, JoAnn's or your local craft store), Exacto knife, contact paper, permanent marker, any pattern you will be using and whatever you want to etch.


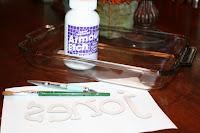
For this I was doing a casserole dish.  Peel off the paper back of the contact paper and stick on the outside bottom of the casserole dish.  I am using chipboard letters for this so trace them onto the contact paper with your pencil or permanent marker. (I use an ultra thin marker)

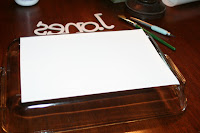
****IMPORTANT! If you are doing the underside of something remember to trace it backwards! Test it by turning the dish over in the direction you would normally use it and see if it "reads" correctly! If so, proceed....if not, stop now and fix!***
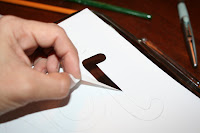
When you have drawn your design, then trace over the lines with your Exacto knife and cut out the part your want etched. (Remember that whatever is glass is the part that will be etched!)


Generously paint on the Armour Etch over your cut-out. Making sure to coat evenly.

Once your design has been coated, you will need to wait for the Armour Etch to work.  The jar says 5 minutes, but I leave on mine for 25. (I also don't follow Advil directions very well either!) In this case, I went to shower and get ready for the day....I came back, washed off the Armour Etch with warm water, peeled off the contact paper and this is what I found! YAY!!
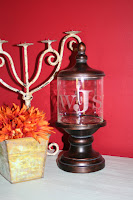
Here are some examples of some pieces that I etched to show on the show today.


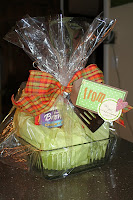
Here is a gift wrapped up ready to give. Inside is a monogrammed, lidded glass dish, a box of brownie mix tied up with a spatula (with a nice big fingerprint!) at the bow.  Give it a try! Everyone will love it!

Sunday, October 5, 2008

Get Well Soon....


We have a new friend whose daughter recently was injured in a softball game.  She had to have surgery and is now out for the rest of the season. Because I don't know her but wanted to send her something, I decided on a candy sundae....figure you can't go wrong with candy, right?!?!? I sure hope she likes chocolate because as of tomorrow she'll have alot to eat (or share!).


**After cleaning my workroom all day, I came across so 
many yummy scraps. I was determined to only use those to make the tag!**


A tutorial on how to make a candy sundae will be coming soon.  : )

Saturday, October 4, 2008

A Special BEE-day party

Recently, I planned a birthday party for someone and it wasn't going to have a theme. However, after choosing the menu, it ended up with one.  I wanted a good 'ole southern meal which we had.  We had fried chicken, mac & cheese, mashed potatoes, green beans, black eyed peas and biscuits & cornbread on the table! YUM! Well, of course you need honey for the biscuits and cornbread so in addition to the honey bear for the table,  I figured I would make some party favors for those attending to take home.  I bought these jars, and this honey (voted #1 in the country, BTW!) and stamped/embossed some tags with a honey bee on the front and on the inside it said Happy Bee-Day! It was a great party but I must admit, it didn't hurt that we finished it up with blackberry & peach cobbler!! The birthday card made with awesome Cosmo Cricket paper!

Tuesday, September 30, 2008

Weird???

Remember the "brownish" pumpkin from the last post?? Well, here it is now! I painted a large circle on the front, added our monogram and some dots and I am happy now.  Although, at first, my husband said it was "kind of weird".....I must admit, it made me second guess myself for a minute but at second look I decided that I really did like it even if it is a tad weird!  .....

Sunday, September 28, 2008

What do you do when laundry is taking over???

You make stuff! Ha ha Yes, the laundry is taking over, there is dust all around me, my work room is an absolute disaster but what did I do when I came home from church?!?!??! I sat around and made rings and finished painting pumpkins! I'll post the ring pictures later but here are my pumpkins!

I am VERY pleased with how they turned out.  First let me say that they are done free hand. I am sure the diamonds on my large pumpkin would have been more even if I could have figured out the mathematical equation for lines, etc.  but let's be honest...I can make stuff but math - well, my mind doesn't work that way! Left vs. right brained and I'm whatever isn't math!!!

For those of you who might want details: these are synthetic pumpkins bought at Michael's while they were 50% off! Painted with acrylic paint...I used Outdoor/Indoor gloss by Plaid. Why did I use this? Because it's what I had...no other reason - just grabbed it and started painting.

BEFORE....AFTER.....
AFTER, AFTER.... I never noticed that the med. pumpkin was brownish - I mean I noticed but it didn't seem to matter much until I saw the end result (photo above) of the pumpkins.  I had an extra med. one that was the same white as the large and the small so I re-did it and here it is.  I am altering the brownish pumpkin and will post that one once I finish.

Thursday, September 25, 2008

Got 3 minutes?

OK.  I saw these for sale at a high end boutique store in South Carolina.  I thought they were absolutely precious.  I went to pick it up and when I did, I was shocked.  I saw it was made out of an acrylic photo holder.  Once I saw that, I knew that this could be SO easily duplicated at home so I just made a mental note and came home and rushed to buy some frames so that I could make some.

I'm telling you ....if you have enough time to make a pb & j, then you have enough time to make one of these ADORABLE post it note holders!! Literally, it took me less than 10 minutes to make 3!! Now, I went very simple and didn't do any embellishments but you can get crazy and do all kinds of stuff to it if you so desire.  

Directions:
***These Post-It pad holders are made from 4 x 6 and 5 x 7 acrylic photo frames - you know the ones that are about $1 - $3 depending on where you buy them.  I was so anxious to make them, I just bought them and mine were $2 but you can definitely get them for less. Once you have the frame you need some paper, ribbon ( I prefer ribbon with wire) and your pad of post-it notes.

If you get a 4 x 6 frame, then cut your background paper to 4 x 6 - if you got 5 x 7 then cut it t0 
5 x 7.  Simply slide it in the frame like you would a picture. If you notice, on a couple of mine I put a square that would "border" the post it pad.  This was adhered to the paper before I slid it into the frame.  I cut those 3. 5 inches square. After that, peel off the back paper to the pad and stick onto the frame.  Tie your ribbon around the frame at the end that would stand on a table. After this, YOU ARE DONE!! I am thinking these would make GREAT hostess gifts for those functions that are going to start now that it is fall.  Or great teacher gifts...the possibilities are endless!


Thursday, September 18, 2008

Happy 13th!

Thank goodness my youngest is pretty compliant ( and patient!) because we had planned a sleepover for her bday... It was going to be a Happy 12th! , then it was going to be a sleepover given a tad late, then I thought maybe a 12 1/2 bday party...well, before I knew it, she was turning 13 so I HAD to follow through and do a party. (anything at this point would have been good!) 

Once the idea came for her invite, they didn't take too long to make and I had one happy girl!

Saturday, September 13, 2008

Wicked Tickets!

A while back, my youngest daughter and I camped out with some friends at The Fabulous Fox theatre in downtown Atlanta to make sure that we didn't miss out on seeing Wicked the Musical when it comes to town.  Since we were camping out we took orders from our friends so that we could all go as a group.
Well, it's time to distribute the tickets and the other day, while at Michael's, I found a WICKED stamp in the $1 bin!!! How timely! so I stamped some lime green paper bags (had in stash) with the stamp using Versamark ink and embossed the image in black.  Punched a couple of holes, put tickets in and closed it up with some cute white and black gingham ribbon.  Was that necessary?  Well....no, but how much more fun to get your tickets in this cute package than just being handed them! Definitely time well spent for my friends! (don't tell them it just took a minute!!)