Pages

Showing posts with label altered items. Show all posts

Tuesday, November 11, 2008

You mean I missed Halloween!?!?!?

Just kidding!  But it DID fly by! Somehow it got lost with everything else I had going on.  I used to make awesome costumes for my kids but now they just pulled something together on their own. (granted, they are 13 & 16 and one is a college freshman!!) But for some reason my girls wanted to Trick-or-Treat this year.   It's the latest craze amongst teens - pretend for one night that you're still little!! I actually like that they want to stay young for a bit!

Our son did come home for the weekend and I did help him with his makeup - he was the Joker from The Dark Knight.  He came home because we had tickets to see Wicked! If ever you have a chance to go see it...GO! It is SO worth every penny! The minute it was over, I wanted to see it again!

Anyway, I didn't get a chance to post some altered letters I did and I will give you a peek at my mantle - or should I say my dusty mantle but hey! who wants to dust when there is paper to play with?!?! I love mantles!! The jack-o-lanterns have been taken down and put away for another year but it is still ready for Thanksgiving. :)


Monday, October 6, 2008

Etched Glass


So, today's segment on Everyday with Marcus & Lisa was on etching glass.  I'm telling you it is SO not hard! and looks fabulous!! Definitely something you could do for yourself, your friends, as a hostess gift, teacher gift or even a gift for that hard-to-buy-for executive in your life (i.e. BOSS!)

Supplies needed: Armour Etch (available at Michael's, Hobby Lobby, JoAnn's or your local craft store), Exacto knife, contact paper, permanent marker, any pattern you will be using and whatever you want to etch.


For this I was doing a casserole dish.  Peel off the paper back of the contact paper and stick on the outside bottom of the casserole dish.  I am using chipboard letters for this so trace them onto the contact paper with your pencil or permanent marker. (I use an ultra thin marker)

****IMPORTANT! If you are doing the underside of something remember to trace it backwards! Test it by turning the dish over in the direction you would normally use it and see if it "reads" correctly! If so, proceed....if not, stop now and fix!***
When you have drawn your design, then trace over the lines with your Exacto knife and cut out the part your want etched. (Remember that whatever is glass is the part that will be etched!)


Generously paint on the Armour Etch over your cut-out. Making sure to coat evenly.

Once your design has been coated, you will need to wait for the Armour Etch to work.  The jar says 5 minutes, but I leave on mine for 25. (I also don't follow Advil directions very well either!) In this case, I went to shower and get ready for the day....I came back, washed off the Armour Etch with warm water, peeled off the contact paper and this is what I found! YAY!!
Here are some examples of some pieces that I etched to show on the show today.


Here is a gift wrapped up ready to give. Inside is a monogrammed, lidded glass dish, a box of brownie mix tied up with a spatula (with a nice big fingerprint!) at the bow.  Give it a try! Everyone will love it!

Sunday, October 5, 2008

Get Well Soon....


We have a new friend whose daughter recently was injured in a softball game.  She had to have surgery and is now out for the rest of the season. Because I don't know her but wanted to send her something, I decided on a candy sundae....figure you can't go wrong with candy, right?!?!? I sure hope she likes chocolate because as of tomorrow she'll have alot to eat (or share!).


**After cleaning my workroom all day, I came across so 
many yummy scraps. I was determined to only use those to make the tag!**


A tutorial on how to make a candy sundae will be coming soon.  : )

Saturday, October 4, 2008

A Special BEE-day party

Recently, I planned a birthday party for someone and it wasn't going to have a theme. However, after choosing the menu, it ended up with one.  I wanted a good 'ole southern meal which we had.  We had fried chicken, mac & cheese, mashed potatoes, green beans, black eyed peas and biscuits & cornbread on the table! YUM! Well, of course you need honey for the biscuits and cornbread so in addition to the honey bear for the table,  I figured I would make some party favors for those attending to take home.  I bought these jars, and this honey (voted #1 in the country, BTW!) and stamped/embossed some tags with a honey bee on the front and on the inside it said Happy Bee-Day! It was a great party but I must admit, it didn't hurt that we finished it up with blackberry & peach cobbler!! The birthday card made with awesome Cosmo Cricket paper!

Tuesday, September 30, 2008

Weird???

Remember the "brownish" pumpkin from the last post?? Well, here it is now! I painted a large circle on the front, added our monogram and some dots and I am happy now.  Although, at first, my husband said it was "kind of weird".....I must admit, it made me second guess myself for a minute but at second look I decided that I really did like it even if it is a tad weird!  .....

Sunday, September 28, 2008

What do you do when laundry is taking over???

You make stuff! Ha ha Yes, the laundry is taking over, there is dust all around me, my work room is an absolute disaster but what did I do when I came home from church?!?!??! I sat around and made rings and finished painting pumpkins! I'll post the ring pictures later but here are my pumpkins!

I am VERY pleased with how they turned out.  First let me say that they are done free hand. I am sure the diamonds on my large pumpkin would have been more even if I could have figured out the mathematical equation for lines, etc.  but let's be honest...I can make stuff but math - well, my mind doesn't work that way! Left vs. right brained and I'm whatever isn't math!!!

For those of you who might want details: these are synthetic pumpkins bought at Michael's while they were 50% off! Painted with acrylic paint...I used Outdoor/Indoor gloss by Plaid. Why did I use this? Because it's what I had...no other reason - just grabbed it and started painting.

BEFORE....AFTER.....
AFTER, AFTER.... I never noticed that the med. pumpkin was brownish - I mean I noticed but it didn't seem to matter much until I saw the end result (photo above) of the pumpkins.  I had an extra med. one that was the same white as the large and the small so I re-did it and here it is.  I am altering the brownish pumpkin and will post that one once I finish.

Thursday, September 25, 2008

Got 3 minutes?

OK.  I saw these for sale at a high end boutique store in South Carolina.  I thought they were absolutely precious.  I went to pick it up and when I did, I was shocked.  I saw it was made out of an acrylic photo holder.  Once I saw that, I knew that this could be SO easily duplicated at home so I just made a mental note and came home and rushed to buy some frames so that I could make some.

I'm telling you ....if you have enough time to make a pb & j, then you have enough time to make one of these ADORABLE post it note holders!! Literally, it took me less than 10 minutes to make 3!! Now, I went very simple and didn't do any embellishments but you can get crazy and do all kinds of stuff to it if you so desire.  

Directions:
***These Post-It pad holders are made from 4 x 6 and 5 x 7 acrylic photo frames - you know the ones that are about $1 - $3 depending on where you buy them.  I was so anxious to make them, I just bought them and mine were $2 but you can definitely get them for less. Once you have the frame you need some paper, ribbon ( I prefer ribbon with wire) and your pad of post-it notes.

If you get a 4 x 6 frame, then cut your background paper to 4 x 6 - if you got 5 x 7 then cut it t0 
5 x 7.  Simply slide it in the frame like you would a picture. If you notice, on a couple of mine I put a square that would "border" the post it pad.  This was adhered to the paper before I slid it into the frame.  I cut those 3. 5 inches square. After that, peel off the back paper to the pad and stick onto the frame.  Tie your ribbon around the frame at the end that would stand on a table. After this, YOU ARE DONE!! I am thinking these would make GREAT hostess gifts for those functions that are going to start now that it is fall.  Or great teacher gifts...the possibilities are endless!


Saturday, September 13, 2008

Wicked Tickets!

A while back, my youngest daughter and I camped out with some friends at The Fabulous Fox theatre in downtown Atlanta to make sure that we didn't miss out on seeing Wicked the Musical when it comes to town.  Since we were camping out we took orders from our friends so that we could all go as a group.
Well, it's time to distribute the tickets and the other day, while at Michael's, I found a WICKED stamp in the $1 bin!!! How timely! so I stamped some lime green paper bags (had in stash) with the stamp using Versamark ink and embossed the image in black.  Punched a couple of holes, put tickets in and closed it up with some cute white and black gingham ribbon.  Was that necessary?  Well....no, but how much more fun to get your tickets in this cute package than just being handed them! Definitely time well spent for my friends! (don't tell them it just took a minute!!)

Tuesday, September 2, 2008

Water & Soda Bottle Treats

Another idea  shown on last week's segment was a "Just Because" treat of a water bottle or soda.  These would be a great treat for anyone! And you can keep thinking of different things to package up.  My brother suggested Gatorade and a power bar for the sanitation workers! With Thanksgiving  & Christmas coming up, I think that is a perfect treat to leave them! 

Tip*****One thing I suggest is to do it with double sided cardstock for both visual appeal and sturdiness

These are really simple ideas and didn't take but a minute to make.  You can get all crazy and make the pouches alot cuter with more embellishments and add-ons, but one thing I really want to show is that you don't have to!  This is just as cute and the thought is just as sweet!! :) Alot of times, I can get sidetracked because I want to make it a "certain way" but instead I just never do it! I would rather do something than nothing. I love giving little gifts!

This first example is something I definitely would want to get! A DP with a pouch holding peanut M&Ms. :) yum.  The strip of paper is double sided, cut 4.5 inches wide and 12 inches long.  I just stapled the sides and punched a hole for the bottle with my 1 1/4 inch circle punch.  SO EASY!

Same directions here, but instead of candy, I put a mini bag of popcorn in the pouch.Here I used a water bottle and a lemonade pouch.  The paper was cut 3 inches wide and 9 inches long.  Literally, just eyed where I wanted the pouch made and instead of stapling, I stitched the sides on my sewing machine.
Again, this stuff isn't hard - really, there's nothing to it, 
but it is just taking a few extra minutes to make something a bit more special.  

Wednesday, June 4, 2008

Graduation Invitations

As I told you, in the previous post, our kids went to Beach Camp. So I am taking a couple of minutes to post some new stuff.

Our son is now a high school graduate and I wanted to share how his party invitations came about.

First, I found this AWESOME graduation symbol at http://www.shutterstock.com/. I knew I wanted the invitation round, but was thinking about doing it larger and packaging it in a CD envelope. Before I got around to making it the size of a CD envelope, I found some chipboard coasters at Michael's on clearance. Gotta love that! From the looks of them, you can tell why they were on clearance! They have fruit all over them and are not the prettiest.
So I adjusted the file to the diameter of the coaster and printed 4 to a page. I cut them out with a circle cutter and mod podged them to one side of the coaster. I copied the file and removed the symbol and replaced it with text for the party invite. I cut those out and mod podged them to the other side of the coaster. I sanded the edges to distress them a bit and to smooth down the edges.

They ended up round just like I wanted and how cool to have a "token" type invite! Another benefit of having the smaller-than-a-CD size was that I just put them in with the announcement and mailed them together instead of the square envelope that would have cost us extra postage!

Swimsuit Dilemma

Ok, so we have 2 teenage daughters - both of which are wonderful! (most days! :) and in getting them ready to go to Beach Camp, with the student ministry at church, we have been on the search for the perfect one-piece swimsuit... hence, the title "Swimsuit Dilemma". We found many but most either didn't fit properly or were too revealing. Usually finding that because they were too revealing was causing "the not fitting properly"! We finally found one that was almost acceptable. In seeing it on my youngest, I thought we could make it work with a little adjustment.
We went straight to Hobby Lobby and I bought some ribbon that I thought would work. It wasn't wide enough so I sewed three strips together to make the inset. ***Tip: I put Fray-Check on the cut ends before sewing them. That stuff is fabulous!
I pinned the inset that I had made from the ribbon to the correct position and handstitched it in. (Clarification: Actually, my mom dropped by about that time and she handstitched it in!)
It didn't take long at all to make a revealing swimsuit turn into a modest swimsuit.
On another note, my other daughter also had an issue with the swimsuit that she was taking. It, too, was too low cut. I tried the ribbon thing for her too (different ribbon of course!) but it didn't look right. We ended up stitching up the opening about 2 1/2 inches. It solved the problem.
Remember when looking for clothes, household decor or whatever else you might be on the prowl for that you can change it. You don't have to wear it as you bought it or display it as the store had it!


Friday, May 9, 2008

Extra Special Thank You

We recently received a very special invitation in which case I felt it called for an extra special thank you! Something a little more memorable than a regular thank you card. So, I got on the internet and found the towel animal directions here. Made the card super quick by sewing a pocket and making a card that pulls out. It truly took me longer to try to navigate through my work room than it did to put this together - it's quite the mess right now !! About 15 minutes from start to finish for a pretty cute thank you if I say so myself. :)

Monday, May 5, 2008

Creative Gift Packaging

Today's segment on Every Day with Marcus & Lisa was on creative gift packaging. Let me just say that our time (12 minutes) evaporated! Before I knew it, it was time to wrap it up (no pun intended!! haha) and we were done. I didn't get to everything, which is fine because it leaves something to show the audience another time. : ) We had a great time and Lisa highlighted some fabulous jewelry too. Make sure to check it out.

Like I told ya'll, the purpose of the whole segment today was to show some creative ways to package gifts. I featured paint cans and some small felt purses that I had designed.
Instructions for Decorated Paint Cans:

Start with an empty paint can. These are new cans which can be purchased at your local hardware stores. (I am into recycling, but there is something about trying to clean out a paint can that isn't very appealing!)

You will also need some double sticky tape. I used Stampin Up! sticky strip tape, but have also used Terrifically Tacky tape too. Both work well.

You will need to measure from right under top rim to right above the bottom rim. The measurement from rim to rim for the cans I bought are as follows: gallon, 7 7/16 inches and quart, 4 5/8 inches.

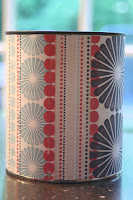
This is a quart sized can. I put a 2.5 inch wide piece where the seam is. ***tip: I used a paper with a stripe in it so that the piecing wouldn't be as obvious.***

Cut your paper and along all 4 sides, run the sticky tape. Peel off backing and stick to can. Work carefully as it is VERY tacky and sticks easily. Gently place the paper on so in case you have to attempt to take it back off you will have a better chance.
I added the 2nd piece of paper that covered remaining surface of the can, adhering it with sticky tape as you did in the earlier step - this piece will measure 12 inches long, which is the full width of a piece of a 12 x 12 inch scrapbook paper.
Then I embellished it with a chipboard star, the letter "P" and some twine and in went a bundle of hand-stamped onesies for a sweet little friend. I hammered it shut and gave a paint can opener along with it.
Another version of the quart sized can - I used the sewing machine on this one though. I made a "Koozie" of sorts and the covering literally slipped on and then the heart on top was sewn and stuffed so that it is raised.The gallon paint cans are done the same way. Measuring, cutting, taping and placing paper on can. Below are some that were on the show today.
If you have any questions, just send them my way. I hope you'll try to make one of these....it's a great way to package a gift!